Your vinyl floors do a tough job every day-dealing with kids running around, dropped drinks, maybe even muddy paws. Even so, making them sparkle isn’t always easy. You wipe them down, yet streaks stick around anyway. Spot a scratch? Not sure how to wipe it away.
The bright side? You’re not the problem. It’s more about picking the right way. How to clean vinyl floors turns out pretty simple when you’ve got the inside tips. Follow this walkthrough to nail that shiny, no-streak result without fail.
The Golden Rule: Less is Always More
First off, before diving into gear, there’s one key thing to remember. Vinyl doesn’t get along with water-really. Excess moisture? That’ll wreck your nice vinyl flooring faster than anything else.
Imagine wiping a fragile wood tabletop, rather than blasting concrete outdoors. Use a cloth that’s barely wet-more like misted than drenched. After swiping across, let it feel nearly dry within seconds. Stick to this tip alone-it’ll dodge most messes before they start.
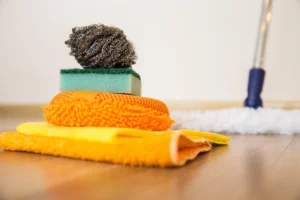
Your Cleaning Toolkit: The Right Tools for the Job
Getting what you need makes things way easier. On the flip side, bad picks might mess up surfaces or leave gunk behind.
Essential Cleaning Tools
- A pH-neutral cleaner for vinyl floors? Essential made just for luxury vinyl plank (LVP) and similar surfaces, these formulas tackle dirt while protecting the top coating. Not too harsh, not too weak-just right. Try trusted names like Bona or Rejuvenate; they get the job done without risks.
- A microfiber mop? Yeah, that’s the one you want. Super soft stuff soaks up spills fast. Catches grime instead of just shoving it around. A squirt-top model is usually simpler to handle.
- A microfiber dust mop works well every day-keeps dirt from building up. Use it early to stop grime before it spreads.
- A soft-bristle vacuum works well when cleaning thoroughly once a week. Pick one that comes with a floor brush tool. Instead of using models with rotating beaters, go for gentler options.
Products to Avoid
- Vinegar mixed with water? Super popular-but bad news. It’s acidic, see. Eventually, that acid breaks down the shield on your floor, leaving it faded and blah.
- Steam mops? Total disaster for vinyl floors. High temperatures, along with dampness, make planks bend, curl up, or even start peeling apart.
- Abrasive cleaners can damage the finish-skip anything with bleach, since it scratches; also, avoid ammonia, which clouds the look; even gritty powders wear down the shine over time.
- Oil soaps or wax-based cleaners can coat the surface with this grime pulls in dust, plus it blocks future touch-ups from sticking right.
The Perfect Cleaning Routine: A Step-by-Step Guide
This method works great for cleaning vinyl floors. Stick to this easy plan to keep your floor looking good all the time.
Step 1: The Daily Sweep
Dirt, dust, or fur from pets acts like fine grit. Each step you take drags them deeper into the surface coating.
- What to do: Wipe down your floors using a microfiber mop now and then-just grab it every couple of days. This tiny chore needs under five minutes yet changes everything. Instead of waiting, tackle it fast so things stay clean without effort piling up.
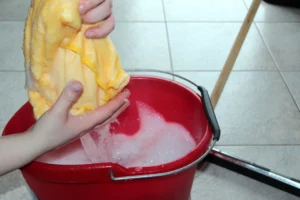
Step 2: The Weekly Mop
This is when you make it gleam again. Here’s the correct how to mop vinyl floors.
- Pick up debris before wetting the surface-skip this step, and you’re just spreading gunk around. Use a broom or suction tool to clear junk; otherwise, mopping pushes the mess instead of fixing it.
- Spritz instead of dumping-load up your spray mop using a balanced-cleaning formula. Spray just one small section, about three feet square. Water straight from the bottle? Nope, skip that every time.
- Mop in a figure-eight pattern: Glide your wet microfiber cloth back and forth like a zigzag motion. This way, you lift the grime and prevent streaks.
- Squeeze regularly-when using a basic mop, press it till it’s barely wet.
- Head over to the next area-keep going till the whole space is clear. Use a fresh approach each time without repeating steps exactly.
How to Fix the 5 Most Annoying Vinyl Floor Problems
Stuff goes wrong. That’s why you need real solutions-the kind most basic guides skip entirely.
Problem 1: Annoying Black Scuff Marks
- The Fix: If it’s just a light scratch, wipe it using any dry microfiber rag you’ve got lying around. When the stain looks darker or greyer, grab a fresh tennis ball-yes, really. Work at the mark by scrubbing lightly with its soft, nubby surface. That slight grit usually erases the spot fast while keeping your flooring safe.
Problem 2: Crayon and Craft Marks
- The Fix: Use a bit of rubbing alcohol on a fresh rag. Gently rub the mark. This stuff dissolves wax but won’t mess up your flooring. Afterwards, go over it with a damp wipe to clear away leftovers.
Problem 3: A Cloudy or Sticky Film
- The Cause: It’s almost always from using the wrong cleaner-say, vinegar-or just dumping way too much in without washing it off after.
- The Fix: Mix 1 part rubbing alcohol-about a cup-with a gallon of lukewarm water. Use that mix to mop, which helps remove the sticky leftover layer from before. Since the alcohol dries fast, there’s nothing gummy left behind. Then go over it again, like usual, just with your gentle cleaning soap.
Problem 4: Tough Pet Stains
- The Fix: For fresh accidents, blot them immediately. With dried messes, mix baking soda and water into a thick blend. Spread that over the stain, wait a short while. Use a gentle rag to rub lightly. Afterward, go over it with a damp wipe.
Problem 5: Fine Scratches
- The Fix: Tiny, light marks on the surface usually fade out easy. Try rubbing in a dab of floor polish that matches your floor’s sheen-go with satin if that’s what you’ve got, glossy if not. Work it in slowly using a gentle rag till it blends. This little bit slips into the tiny grooves, smoothing things up while bringing back the glow.
Frequently Asked Questions (The Real-World FAQ)
Q1: Can I use a Swiffer WetJet on my vinyl floors? Right, it’s fine-this thing sprays only a little bit of liquid. But grab the real Swiffer floor cleaner built for solid surfaces instead of regular tap water.
Q2: Why do my floors still look dirty after I mop? This often happens for one of two reasons-maybe your mop pad’s grimy, maybe the cleaning solution leaves behind residue. Kick things off with a fresh pad while picking a balanced, pH-safe formula instead.
Q3: Can you safely clean WPC vinyl floors using a steam mop? Nope. Using it under any vinyl plank flooring-like WPC, isn’t a good idea. Heat or dampness could wreck the edges and inner layer, so the chances are too risky.
Q4: What’s a good way to stop vinyl floors from being so slick? The easiest fix? Just wipe them down now and then. Grime or grit might leave surfaces slick underfoot. Try tossing down some small carpets where people pass through a lot-also grab scraper pads by entrances so less gunk gets dragged inside.
Your Floors, Your Pride
Caring for your vinyl floors doesn’t need to feel like work. Using an easy method along with proper supplies helps guard what you’ve paid for while seeing that shine daily. Just stick to one key idea-stay light on them, avoid moisture, then notice how they brighten up the space.